For the past few years I’ve been working a lot with 360
degree panoramic photos and more recently I’ve been putting more and more
effort in to get to harder to reach places to get these photos. It was only
just over 1 month ago now that I decided to do a 3 day walk which was dedicated
to take a single panorama!
Lots of my recent panoramas have been in mountainous
regions and, I’m not sure about you, but when I’m in areas with lots of
mountains I normally find myself wondering, which mountain that is over there
to the North-East. It wasn’t until I discovered the existence of a mobile phone
application which helps with this that I decided to try and implement something
into my panoramas.
My panoramas can all be viewed on my website at www.davidrowley.co.uk/pano.php
here the panoramas are viewed interactively, so you can scroll around the
panorama, look up, look down, round, zoom in and out. I had already been using
PostGIS 2.0 for calculating distances to other panoramas, this allowed me to
find the nearest panoramas from another panorama accurately.
Once I had seen the mobile application which named the
peaks I decided that I would try to do something similar in my panoramas. The
platform I was using at the time was perfect to allow me to do this. I use some
software called krpano, this allows my flat 360x180 degree panoramas to become
interactive. It also allows many other things to be done, you can have hotspots
to other panoramas and even include video in your panorama to bring things to
life!
KRPano is programmed by making reference to XML files which contain setup information and code to tell the panoramic viewer what to do. For me I write these XML files dynamically using PHP and I use PHP to read details about the panorama directly from my PostgreSQL 9.2 database. I was really already half way to displaying the names of the mountain peaks in my viewer. It was just a simple matter of gathering up some peak data and writing some code to layer them onto the pano. Remember I didn’t want to have to name my peaks manually… I wanted to have this done automatically.
The first step was gathering some peak information from
open street maps. I now had a fairly large list of mountains loaded into a
table in my database. I then added a Geography column to the table and set a
trigger to update this column from the latitude, longitude and elevation
columns. With about 1 day of work my panoramic viewer was showing me mountains.
I had written algorithms to calculate the pitch/angle to the top of the
mountain based on the elevation of the mountain and the elevation of the
panorama along with the distance between the 2. The algorithm takes into
account the curvature of the earth, but still will need some more work to
correct for atmospheric refraction.

With the open street map layer enabled a typical scene
from my panoramic viewer now looked like this
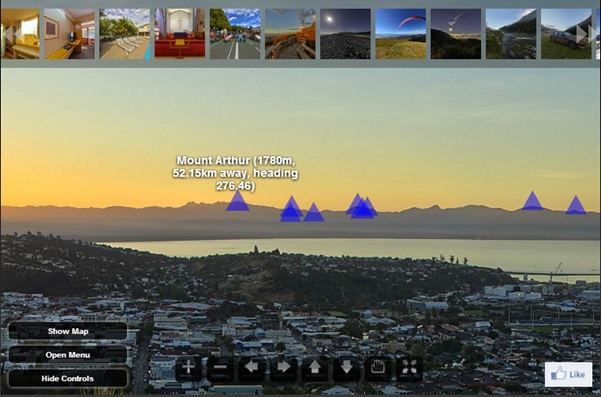
To get this far I created a single function that sits in
the database and when passed a location and radius it returns a list of
mountain peaks which are within that radius, along with the bearing and pitch to that peak.
When I clicked refresh on my web browser I was really
happy to see the scene above. I had learned a lot about PostGIS on this day and
was fairly happy with what the outcome was. It was just a matter of hovering
over the blue triangle and it would tell you the name and elevation of the peak
behind it!
Now, if you look more closely at the peaks in the above
image then you’ll see that some of the triangles are grouped quite closely
together. Let me zoom in and give you a closer look:

Annoyingly here the mountain named “Tableland” is
slightly lower and further away than the slightly higher “Gordon’s Pyramid”. So
really listing Tableland was wrong here as it could not actually be seen!
This was not the only problem. I was also hitting
problems were certain panorama the mountains did not line up despite me being
totally accurate with their locations and elevations.

In the above image you can see that Mount Cook is much
lower than it’s meant to be. The problem here lies with the panorama not being
perfectly level… Something which is very hard to do in mountainous areas even
after you make sure your tripod is as level as you can get it.
So it seems there’s going to be a fair bit more work to
do to get this working as I want it.
Calculating Line of Sight
The first step was to gather up some elevation data.
Thanks to NASA and some hard work from a dedicated man in Scotland most of the
world’s elevation data is available for free here http://www.viewfinderpanoramas.org/Coverage%20map%20viewfinderpanoramas_org3.htm
I started by downloading all the elevation data for New
Zealand, which when I loaded it into the 3dem software which can be found on
the viewfinderpanorama.org website I got this familiar shape.

The next step was to figure out some way to load these
files into my PostgreSQL database. Luckily this is very simple as PostGIS comes
with a tool to turn these elevation files into an SQL file which can be
imported with psql.
I put all my .hgt into 1 directory and ran the following
command:
"C:\Program
Files\PostgreSQL\9.2\bin\raster2pgsql.exe" -s 4326 -I -C -M
"HGT\*.hgt" -F -t 75x75 public.demelevation > elevation.sql
The above command creates a file called elevation.sql
which contains all the CREATE TABLE command and imports all the data then
properly constraints the tables to help PostgreSQL’s query planner do its job efficiently.
Before working with this elevation data I had no idea
what a raster was. So if you’re in the same boat, then it is basically a raster
when you’re talking about spatial data is a tile or array of data relating to a
patch of the surface of the planet. A raster contains its anchor point and
contains information about the resolution of the raster, and is generally very much like a
bitmap. The remainder if the data is just an array of values. In the case of
the raster’s that we are working with, this array of values is elevation data
in metres.
Once I loaded the above file I could find the elevation
for any point in New Zealand with the following command:
SELECT ST_VALUE(e.rast, ST_SetSRID(St_MakePoint(170.1420703, -43.594937), 4326))
FROM demelevation e
WHERE ST_Intersects(e.rast, ST_SetSRID(St_MakePoint(170.1420703, -43.594937), 4326));
What’s happening here is, we first need to find the
raster tile for the location that we’re looking in, so ST_Intersects in the
WHERE clause will gather all rasters with data about this location. With the
resulting rasters, in this case, since we have no overlap then we only should
have 1. We then ask that raster for its value for the same location. When I run
this command I get the following:
test=# SELECT ST_VALUE(e.rast,
ST_SetSRID(St_MakePoint(170.1420703, -43.594937), 4326))
test-# FROM demelevation e
test-# WHERE ST_Intersects(e.rast,
ST_SetSRID(St_MakePoint(170.1420703, -43.594937), 4326));
st_value
----------
3712
(1 row)
Time: 1.499 ms
This is the approximate elevation of Mount Cook, the
highest mountain in New Zealand. Also you might notice that the database
returned this result to me quite quickly at around 1.5 milliseconds. This is amazingly fast and it's made possible by putting a gist index on the rast column.
So now it’s time to build a function which will calculate
if there is a line of sight between 2 points.
The first step we’d need to take here is to get a raster
which contains all of the rasters between 2 points. Since we can merge rasters
with ST_Union we can run a query like the following.
SELECT ST_Union(rast)
FROM demelevation
WHERE ST_Intersects(rast, ST_SetSRID(ST_MakeLine(St_MakePoint(171, -43), St_MakePoint(171, -44)), 4326));
This will return a single column, single row result
containing a raster with all tiles merged for a line between E171 degrees, S43
degrees and E171 degrees, S44 degrees. We now need to save that raster for
processing so we can determine if there’s something along that line which will
block our line of sight…
I came up with the following function which takes 2 geography parameters and returns true or false depending on if there is a line of sight between the 2 locations. Null is returns if there is no raster data and currently it's a bit undefined if there is partial raster data. Please note that the function currently does not take into account atmospheric refrations, which can have quite a big effect on objects near the horizon and may very well report things not to have a line of sight when they actually do. Currently I'm not quite sure how these should be calculated as most of the methods I've seen calculated for celestial bodies rather than objects on the face of the earth. I would imagine this also must take into account the distance of the object. If you have any ideas how I could implement this then please leave a comment.
I came up with the following function which takes 2 geography parameters and returns true or false depending on if there is a line of sight between the 2 locations. Null is returns if there is no raster data and currently it's a bit undefined if there is partial raster data. Please note that the function currently does not take into account atmospheric refrations, which can have quite a big effect on objects near the horizon and may very well report things not to have a line of sight when they actually do. Currently I'm not quite sure how these should be calculated as most of the methods I've seen calculated for celestial bodies rather than objects on the face of the earth. I would imagine this also must take into account the distance of the object. If you have any ideas how I could implement this then please leave a comment.
CREATE OR REPLACE FUNCTION pano_is_point_visible_from(IN startloc GEOGRAPHY,
                                                      IN endloc GEOGRAPHY
) RETURNS BOOLEAN AS
$BODY$
-- This function calculates if there is a line of sight between 2 points.
-- It does this by analysing elevation data along the direct path towards
-- the destination point.
-- The comments in the function describe the process as if a person was standing
-- at the startloc (parameter) and was walking towards the endloc (parameter)
-- the walking process naturally involves steps. These steps are similar to
-- what the function does. It starts by finding the elevation at both the startloc
-- and the endloc and then calculates the pitch/angle of the line of sight.
-- The function then enters a loop, this is the walking loop, where we start
-- taking steps towards the endloc. After every step we calculate the pitch from
-- the starting location to the end location. If this pitch is ever higher or equal
-- to the pitch of the endloc then we know we cannot see the endloc from the startloc
-- as it's being obscured by our current location.
--
-- The function calculates these pitches using trig functions then it takes that
-- angle which has been calculated and subtracts the number of degrees around the
-- world that the object is away. It does this over a fixed sized sphere rather than
-- a complex spheoid. Please note that at this time atmospheric refraction is not
-- taken into account, this means that objects on the horizon could be miscalculated
-- by around half a degree! This means mountains in the distance will actually be
-- visibly slightly higher than they will be said to be by this function.

DECLARE elevationdata RASTER;
DECLARE tot_distance DOUBLE PRECISION;
DECLARE cur_distance DOUBLE PRECISION;
DECLARE bearing DOUBLE PRECISION;
DECLARE start_elevation DOUBLE PRECISION;
DECLARE end_elevation DOUBLE PRECISION;
DECLARE cur_elevation DOUBLE PRECISION;
DECLARE step_size DOUBLE PRECISION;
DECLARE curloc GEOGRAPHY;
DECLARE end_pitch DOUBLE PRECISION;
DECLARE cur_pitch DOUBLE PRECISION;

BEGIN
      -- This query builds a raster which contains all of the raster data
      -- between 2 points. We use ST_Makeline to create a line between our
      -- starting point and our destination. It is quite possible that we'll
      -- find no or just partial raster data between our 2 points. Later we
      -- do test to see if we got some and return NULL if we found no data.

      SELECT ST_UNION(rast) INTO elevationdata
      FROM demelevation e
      WHERE ST_Intersects(rast, ST_Makeline(CAST(startloc AS GEOMETRY), CAST(endloc AS GEOMETRY)));

      -- If we found no data at all then we can quit... At this
      -- point we have no idea if there is a line of sight, so we
      -- return NULL.

      IF elevationdata IS NULL THEN
            RAISE NOTICE 'No elevation data found.';
            RETURN NULL;
      END IF;

      -- We now set the elevation of our start point and our end point.
      -- Note that there currently is a bit of a fuzz factor here and I'm
      -- adding 2 metres to both these values. This is because at least for
      -- our start value our eyes are above the ground and not on the ground,
      -- so we'll have slightly more things in sight. For the end elevation
      -- this is not quite the case but the 2 metres was added due to the
      -- shapes of some mountains. If for example the mountain is completely
      -- flat at the top and we're standing in a location lower than it, if
      -- the summit location is marked in the middle of that flat area then
      -- we'll not be able to see it. I did not find this ideal as in reality
      -- I could see the mountain, just maybe not quite the middle of the summit,
      -- so the 2 meters being added to the end_elevation is fuzz factor, it
      -- perhaps should be more complex and be happy enough with seeing a point
      -- within X number of meters of the summit. At the time of writing this
      -- I could not decide what that value should be, so it remains like this.

      start_elevation := ST_Value(elevationdata, CAST(startloc AS GEOMETRY)) + 2;
      end_elevation := ST_Value(elevationdata, CAST(endloc AS GEOMETRY)) + 2;

      -- Now calculate the bearing which we must "walk" to
      -- our far off destination.
      bearing := ST_Azimuth(startloc, endloc);

      -- A variable to save the total distance we must walk.
      tot_distance := ST_Distance(startloc, endloc);

      -- Set our step size, smaller steps will mean more loops and slower to calculate.
      -- Also there is no point in going in smaller steps than the detail of the raster.
      -- This should match the raster resolution or be more than it for if performance
      -- is a problem.
      step_size = 30; -- metres

      -- We must now work out the pitch in degrees of our line of
      -- sight from our current location to the destination.
      -- Here we use atan which will give us a pitch, or angle on a triangle, since
      -- the earth is round we need to reduce the pitch by the number of degrees
      -- around the earth that the object is. We use a fixed radius for this which
      -- is not quite accurate but it will do for now. Variations caused by
      -- Atmospheric Refraction will likely cause much more variation than the shape
      -- of the planet.

      end_pitch := degrees(atan((end_elevation - start_elevation) / tot_distance)) - (tot_distance / (6370986 * pi() * 2) * 360);

      -- We now start a loop to walk to our destination.
      -- Note that we stop checking the distance when we're
      -- within step_size to the object, as there's no point in
      -- checking if we can see the object when we're standing
      -- on top of it.

      -- First we just need to take our first step...

      cur_distance := step_size;

      WHILE cur_distance <= (tot_distance - step_size) LOOP

            -- Now work out the location of our new step based on
            -- our starting location, the current distance we've
            -- travelled and the bearing to the destination.

            curloc := ST_Project(startloc, cur_distance, bearing);

            -- Now let's look at the elevation of the current location.
            cur_elevation := ST_Value(elevationdata, CAST(curloc AS GEOMETRY));

            --RAISE NOTICE 'start_elevation = %, end_elevation = %, cur_elevation = %, cur_distance = %, bearing = %',                   start_elevation, end_elevation, cur_elevation, cur_distance, degrees(bearing);

            -- Calculate the pitch to our current location, same as we did for
            -- the destination before the loop began.
            cur_pitch := degrees(atan((cur_elevation - start_elevation) / cur_distance)) - (cur_distance / (6370986 * pi() * 2) * 360);

            -- Now we simply check if the pitch to from our starting
            -- point to our current location is greater or equal to
            -- the pitch we calculated from the start point to the end
            -- point. If it is then we can't see the end location due
            -- to the current point appearing to be taller from the
            -- start point.

            IF cur_pitch >= end_pitch THEN
                  RAISE NOTICE 'Cannot see over object at pitch %. Pitch to destination is %, start elevation %, object elevation = %, distination elevation = %, dist from start = %, dist from end = %',
                        cur_pitch, end_pitch, start_elevation, cur_elevation, end_elevation, cur_distance, tot_distance - cur_distance;
                  RETURN FALSE;
            END IF;

            -- Now we can take another step then start do the whole process again...
            -- That is, providing we've not arrived at our destination yet.
            cur_distance := cur_distance + step_size;
      END LOOP;
      RETURN TRUE;
END;
$BODY$
  LANGUAGE plpgsql STABLE
  COST 1000;
SELECT pano_is_point_visible_from(
         ST_SetSrid(St_MakePoint(170.06488,-43.72071),4326),
         ST_SetSrid(St_MakePoint(170.1420703,-43.594937),4326)
       );
Above I asked the function if it is possible to see the summit of Mount Cook from near mueller hut.
The function tells me that it is.
Now if I'm standing at the same spot, I know that in reality that I can't see Mount Tasman... So let's check if we're getting the correct results.
test=# select pano_is_point_visible_from(ST_SETSRID(St_MakePoint(170.06488,-43.72071),4326), ST_SetSrid(St_MakePoint(170.1572352,-43.5657091),4326));
NOTICE: Cannot see over object at pitch 4.94936475078937. Pitch to destination is 4.83525382423895, start elevation 1815, object elevation = 3002, distination e
levation = 3458, dist from start = 13380, dist from end = 5384.461198757
pano_is_point_visible_from
----------------------------
f
(1 row)
Time: 64.390 ms
If we read the notice raised by the function we can see that we've hit land 13.38km from our starting point and the land we hit was at 3002 metres above sea level.
You can also see that the result was calculated fairly quickly at 64 milliseconds... Though if we need to calculate many points this is likely to become a problem. In the next blog I'll talk about how I optimised the line of slight calculations to cache results in a table. This is practical for my workload and improves performance around 300-400 times. http://davidrowley.blogspot.co.nz/2013/08/optimising-line-of-sight-calculations.html
